Waterpik has been around for many years now, and if you’ve ever used a Waterpik product in the past, then you were probably using a Waterpik Classic. This was the product that started it all by giving users a great clean at an affordable price. It is no surprise, then, that this is one of the most popular products that Waterpik has in its roster. Their newest iteration on one of their longest running products, the Classic Professional, has a lot to live up to. The question is, how does it compare to the original as well as other modern countertop flossers?
Table of Contents
What’s in the box?
Opening up a brand new box of the Waterpik Classic Professional, here is what you’ll find:
- Waterpik Classic Professional base (WP-72)
- Standard Water Tank
- Medication Tank
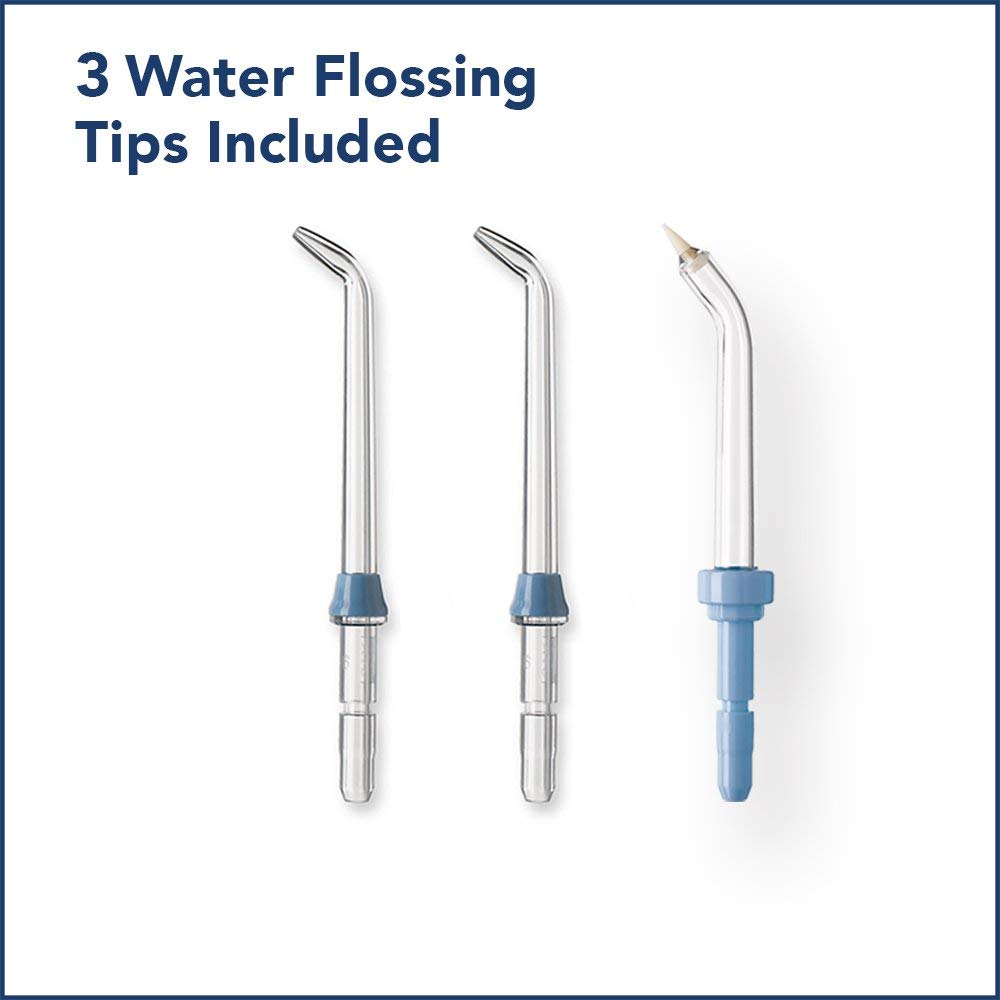
- 2x Classic Jet Tip, 1 Pik Pocket Tip
- Instructions
The first thing we immediately noticed was how barebones the instruction manual is. If you are someone who wants to know every little thing about the product they just purchased, then you will have to figure it out on your own. Thankfully, the device is not particularly difficult to learn to use and part of the fun is figuring things out yourself.
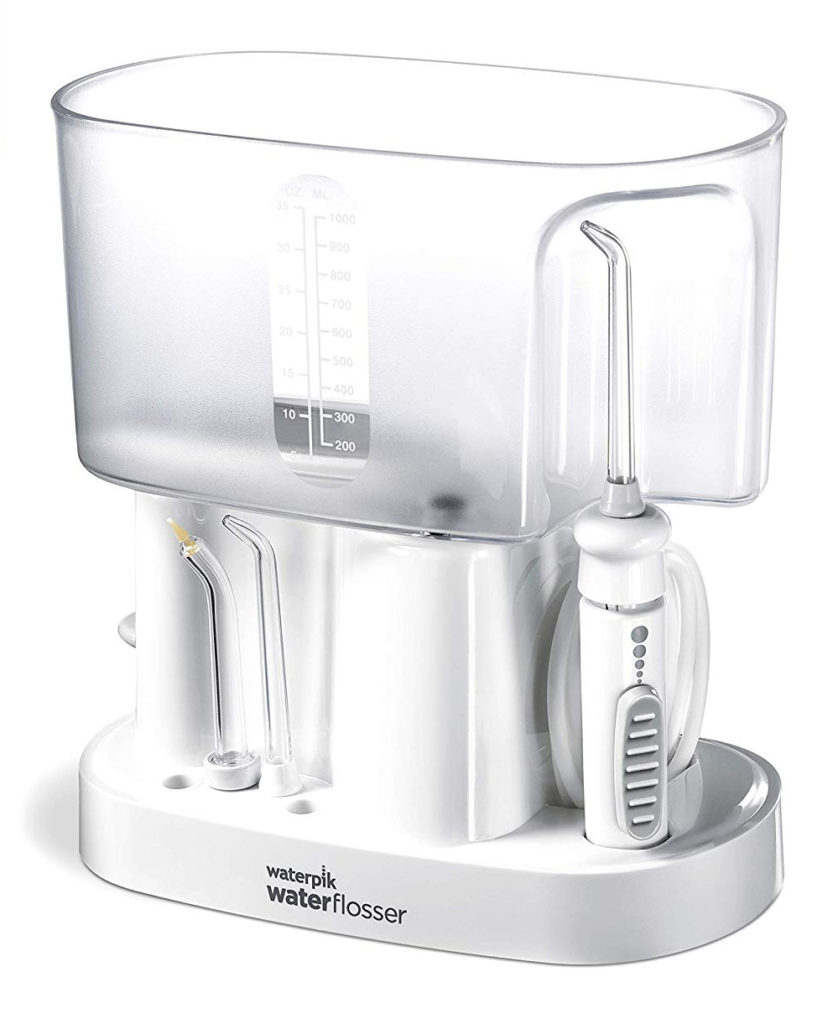
Taking a Look at the Waterpik Classic Professional
The Waterpik Classic Professional (WP-72) is essentially a “modern” version of the Waterpik Classic (WP-60). To be honest, there doesn’t appear to be much of a change between the newest version and the original from over 10 years ago.
Like many water flossers, their design errs on the side of being ugly. Rather than change its appearance to something that you would be proud to display on your bathroom counter, instead it evokes a sense of nostalgia like you are using something your grandparents passed down through the generations and finally it has reached you. If you believe in old school cool, then this won’t be an issue; for everyone else, let’s hope it cleans better than it looks.
First, let’s talk about the water reservoirs. Why are there two of them? The bigger of the two is the high-pressure reservoir, capable of holding 35oz of water. This is perfect for those who want to clean their teeth fully without worrying too much about the water running out.
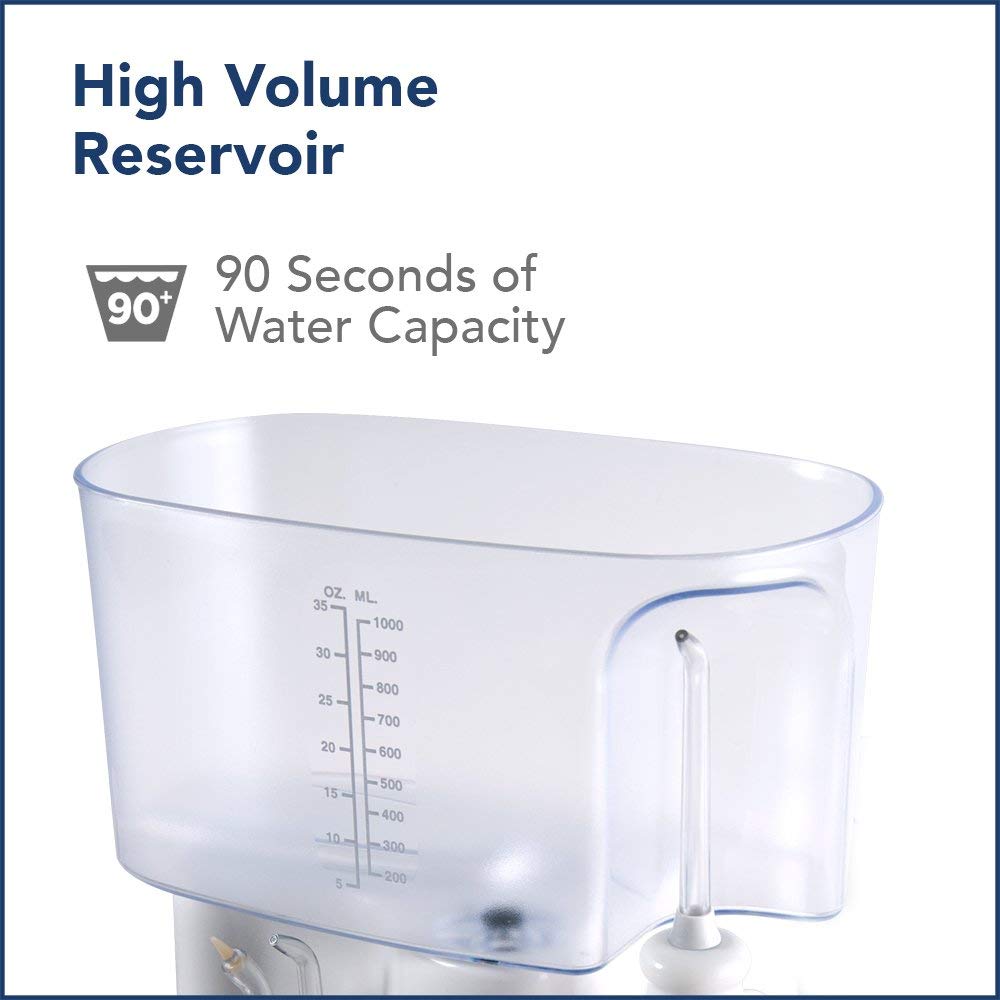
The second, smaller reservoir is the medication reservoir and it can hold up to 10oz of solution. This one is better suited for administering therapeutic rinses and medications where only a limited amount is required.
At the bottom of each reservoir is a small valve made of rubber that acts as a plug when the tank is removed from the base, but it is lifted up when it is loaded onto the base to allow the water to get pumped out.
Hygiene is especially important when it comes to the water tanks, since whatever is stored in them is getting pumped straight into your mouth. You can clean them by hand, or you can load them into the top-rack of the dishwasher for a wash cycle with your dishes. If you do this, be sure to remove the rubber valves as they can get damaged by the heat.
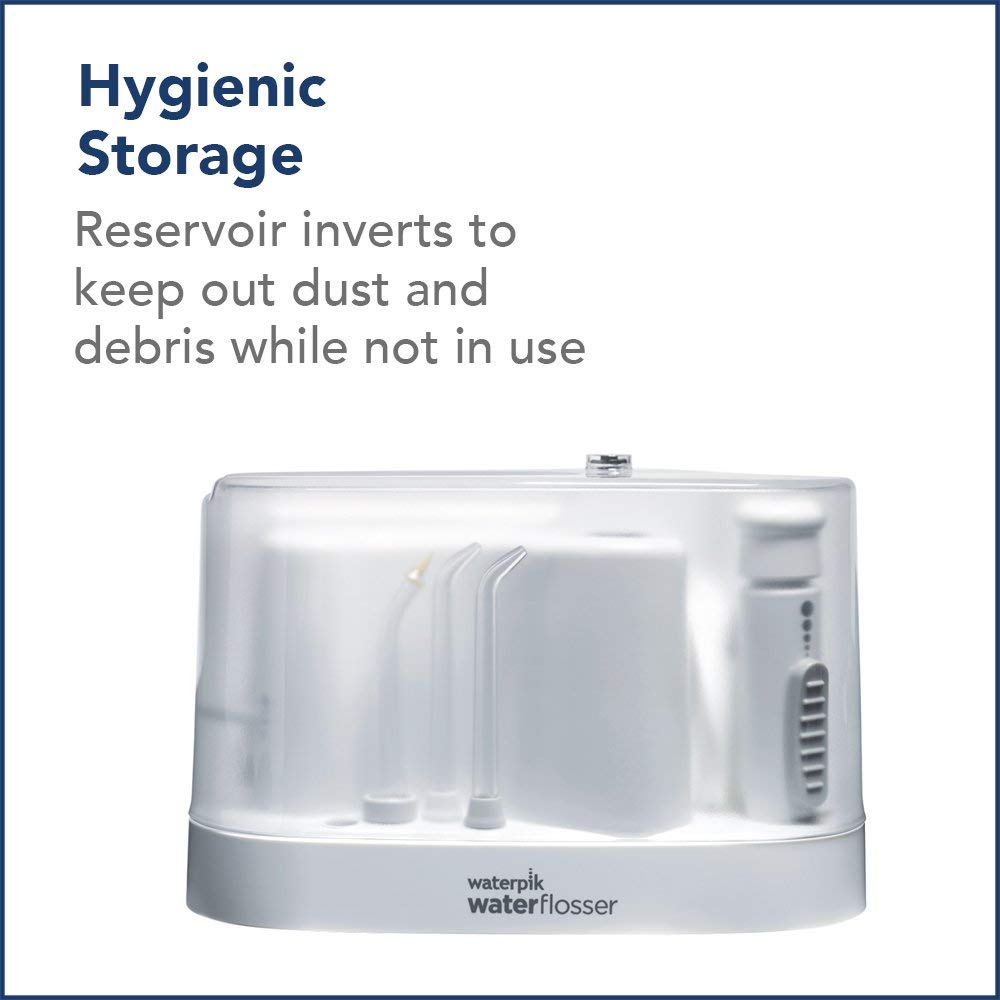
It is also important that water reservoirs be covered so that dust and dirt can’t make their way inside. You might be thinking, “Wait a minute, the Classic Freedom doesn’t come with a lid! How am I supposed to cover the top up?” And the answer is, you can actually flip the water reservoir upside down (when it’s empty of course) and it neatly covers the base station so that the reservoir itself acts as a cover that shields the rest of the product from dust, dirt, and grime, etc.
Speaking of the base station, let’s take a look at that next. Looking at it on its own, you begin to see just how simple and plain the design is. It’s just white on white, however that’s not a bad thing. Hygiene is really important for a product used to service your mouth. On a white surface, dirt and grime is easily visible and you will immediately see that it needs to be cleaned up. The rounded corners make it easy to clean and doesn’t give dirt any place to hide.
On the left side you will find the power switch. It is light grey and quite a large switch which makes it easy to flip with just one hand. There is a small issue with the power switch when you are using the medication reservoir. Due to its smaller size, it is not heavy enough to counteract the force of you flipping the switch up. Therefore, unless you use another hand to stabilize the base station, the unit will be lifted upwards, causing spillage if the reservoir is full. This will be tricky since you will already be holding the flosser handle in your other hand.
This isn’t an issue with the regular reservoir, since it is heavy enough when filled with water to not get lifted up when you try to flip the switch. However, Waterpik should have either added some additional weight in the base station, or made the switch lighter to this issue does not present itself. Most people will not experience this issue, however this warning goes out to those who might want to use the medication reservoir.

Moving on to the front of the unit, you will see four small holes where you can store flosser tips when not in use. This is great if you plan on sharing the water flosser with others or if you have a special routine involving different flosser tips. The tip holder is also within the coverage of the reservoir lid when it is upside down, keeping the flosser tips clean and hygienic.
We would have liked it if the holes were spaced a bit further apart. As they are now, when all four holes are occupied, it is very easy for you to bump into the tips next to it when you are just trying to grab one. Also, keep in mind that the holes lead all the way to the bottom of the flosser. Thus, any wet flosser tips will drip water directly onto your countertop. During testing, we noticed a small puddle form after we put four wet tips in the holder. It is imperative that you clean it up, as mold or mildew can begin to form over time.
If you look at the bottom of the Classic Professional, you will see the power cord as well as two hooks that you can use to wrap the cable around. The power cord can stretch to a maximum length of four feet otherwise. The four black rubber feet provide some good grip on countertops and do not leave any skid marks if you drag it around.
We saved the best for last, and that’s the flosser handle. It is sometimes referred to as a wand or bulb. It has its own designated handle on the right side of the base unit. The handle is connected to the motor pump by length of coiled tubing. As soon as you flip the power switch, the water flosser will roar to life, and water will be pumped through the tubing, into the flosser handle, and out through the flosser tip.
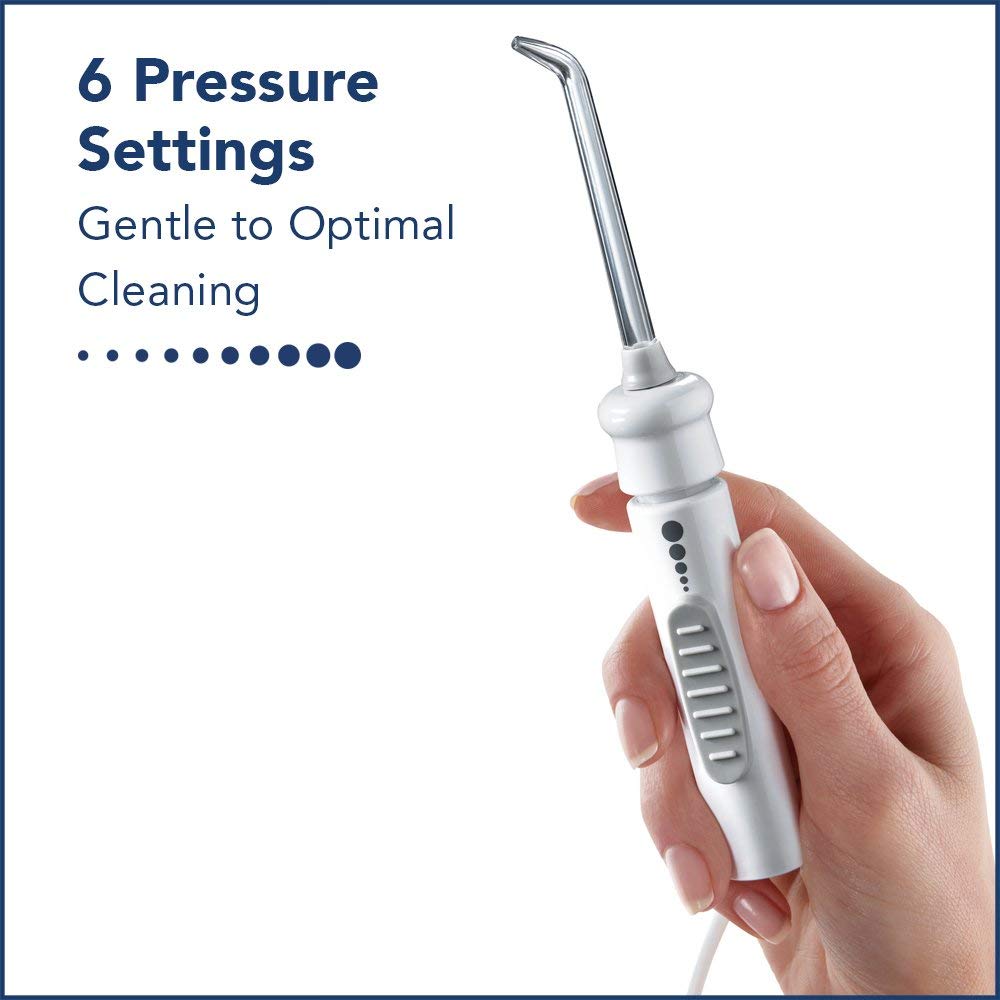
The tubing can be stretched two feet long, and it is highly unlikely that you will use all four feet of the power cord and two feet of the handle tubing. Most water flossers nowadays, like the Waterpik Aquarius Professional, have a wide selection of pressure settings which you can adjust from the base of the unit. You can adjust the water pressure of the Waterpik Classic Professional directly from the handle.
By moving the pressure slider, you can choose between six different pressure settings. The lowest setting (indicated by the smallest circle) shoots water out at 10 PSI, whereas the highest setting (indicated by the largest circle) outputs water at 90 PSI. Other high-end Waterpik products have 10 pressure settings, with each increment adding 10 PSI to the water pressure. Since this product has only six settings, each increment will be greater than 10 PSI which might surprise you if you’re used to other Waterpik products.
Moving on to the back of the handle, you will see a circular rubber button. This button is the pause button, and holding it down will stop the flow of water so that you can move the handle to a different area in your mouth. Releasing the button will allow water to flow again.
Out of all the high-end Waterpik countertop products we have tested, we liked this one the least. We felt it was too small and lightweight, which gives the impression that it is a toy. In terms of cleaning power, however, it was just as capable as the rest.
Waterpik Classic Professional Flosser Tips
Flosser tips connect to the handle and can change the way you clean your teeth. The Classic Professional comes with three to get you started. Two of them are the standard flosser heads that is included with all Waterpik models. Then there is also the Pik Pocket Tip, which can administer water deep into periodontal pockets.
Installing the flosser tip is usually as simple as placing the flosser into the top of the handle until you hear a clicking sound, however this time it was a little trickier. The instruction manual also did a poor job explaining what you are supposed to do, so we had to figure it out ourselves.
To get the flosser tip installed, you have to press down on the bulb-like head with one hand, and with the other, press the flosser tip into the hole until it snaps in place. To remove it, press the bulb-like head down and pull the flosser out.
Once the flosser tip is installed, you can rotate the head 360 degrees so that you can get the perfect angle to clean your teeth without having to turn your hands into an awkward position.
Using the Waterpik Classic Professional
We don’t recommend you use a water flosser at night, and especially not the Classic Professional as it is extremely noisy. You will definitely wake up anybody sleeping nearby.
If you’ve never used a water flosser before, always start flossing at the lowest setting so that your teeth and gums can get used to its strength. Only increase the pressure setting once you no longer experience any pain or discomfort.
During our testing, we felt that the handle was quite a nuisance. Its small size means that people with big hands will have to hold it with just their fingertips as if it were a child’s toy. It was hard to get a good grip on it, and if you want to operate any of the switches or buttons on the handle you probably have to do it while the flosser is turned off.
The pause button was very hard to use the first few times; it was very unresponsive. If you don’t have the finger strength to push it down really hard, some water will leak out. Over time, though, the button loosened up and it was no longer an issue.
Mentioned earlier, once we moved past the issues we had with the flosser handle, it was just as capable of removing plaque from teeth and the jawline as any other high-end Waterpik flosser. And with the large water reservoir installed, you have a whopping 90 seconds of continuous water flow on the highest pressure setting to clean all the nooks and crannies of your mouth.
However, if you are using the smaller medication reservoir, then keep in mind how quickly the water will run out. You really need to keep your finger on that pause button! Once you are finished with flossing, you can simply place the handle back into its spot and the tubing will neatly coil up to its original state.
Even though the reservoir doubling as a lid gimmick seemed really cool and innovative, in practice it was not very effective. First of all, any water still within the reservoir will not dry when it is used as a cover. This means that unless you dry the reservoir, you will still encounter the issue of mold and mildew forming if you have a constantly wet environment. It is important that you regular clean your unit or else hard water can start to form up.
Closing Thoughts
Waterpik’s Classic Professional is a flosser that can get the job done, though it has a few quirks that can make it unsatisfying to use. Even though this product is a bit cheaper than some of Waterpik’s other offerings, it is not cheap enough to be a budget product.
With a barebones instruction manual that is close to useless, and a flimsy handle that is uncomfortable to use, we feel the product will take a lot to get used to. This design may have worked well over a decade ago, but now it is time for it to be redesigned.
If you are in the market for a great Waterpik countertop flosser, we recommend starting off with either the Waterpik Ultra or Aquarius Professional. The Classic Professional isn’t a bad product, it’s just not a good product either and we can only recommend purchasing one you can get a great deal on it.