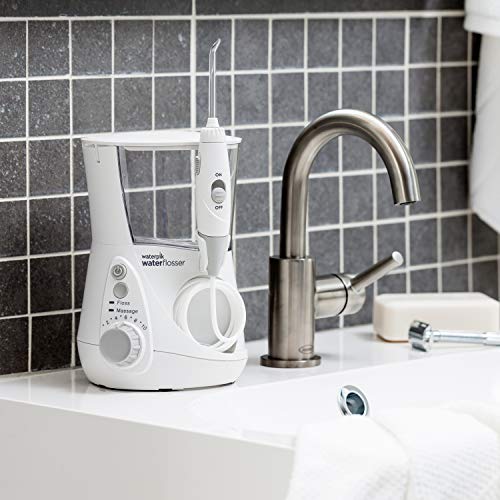
Sleek, compact, and loaded with features, the Aquarius Professional is Waterpik’s best looking product in their lineup to date. Waterpik has moved away from the bulky, clunky designs of many countertop water flossers and instead has gone for a slimmer, elegant design. But, as nice as something can look, it’s performance and results that matter in the end. So how does the Aquarius Professional WP-660 match up to the other top-of-the-line flossers on the market?
Table of Contents
Models
There are four variations of the basic WP-660 that offer a different look if you are not satisfied with the looks of the original. The only differences between these models are purely aesthetic; different color scheme, chrome buttons, shinier coating, etc.
These models may look nicer but they come at a premium. Expect to pay at least an extra $10 over the regular WP-660 model for the product. More expensive is not always better, as we have found that when the coloured models get visibly dirty due to the water marks and grime, the colours only serve to amplify any imperfections on the machine. Unless you plan on cleaning it frequently and really want the specific colour water flosser to fit in with the rest of your bathroom, you should think hard before buying.
What’s included with the Waterpik Aquarius Professional?
When you open your newly purchased Waterpik Aquarius Professional, here is what you will expect to find inside:
- Waterpik Aquarius Professional Water Flosser
- Instruction manual
- Classic Jet tip (x3)
- Orthodontic Tip
- Pik Pocket Tip
- Plaque Seeker Tip
- Toothbrush Tip
The Aquarius Professional requires no assembly; simply select the tip you want to use, fill the reservoir with water, adjust the pressure settings and get flossing!
Features
Let’s go over what exactly the Aquarius Professional can do. First, the reservoir. It can fit up to 22 oz. of water, which is approximately 90 seconds of flossing at the highest pressure setting. You can easily detach the reservoir to fill with water in the sink, however we prefer to use a water pitcher and to keep the reservoir sitting in the flosser.
Large Water Reservoir
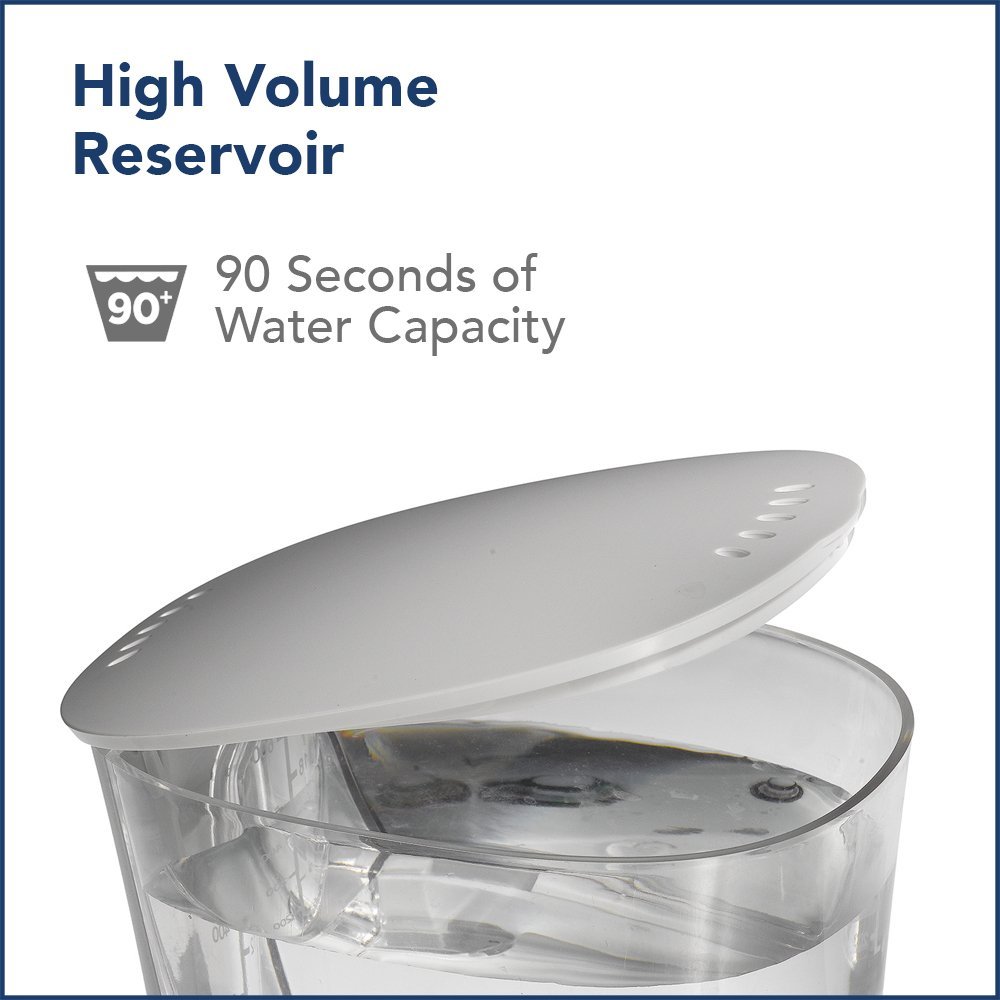
Measurements can be found along the side of the reservoir. For some reason, the measurements are meant to be read from the outside, meaning you would have to remove the reservoir to see exactly how much water you’ve added. It’s no too much of a problem since you should be regularly removing the reservoir to clean it anyways. Thankfully, the container can be used in the dishwasher (top rack) so cleaning is hassle-free if you clean it with your dishes.
Useful Tip Holder
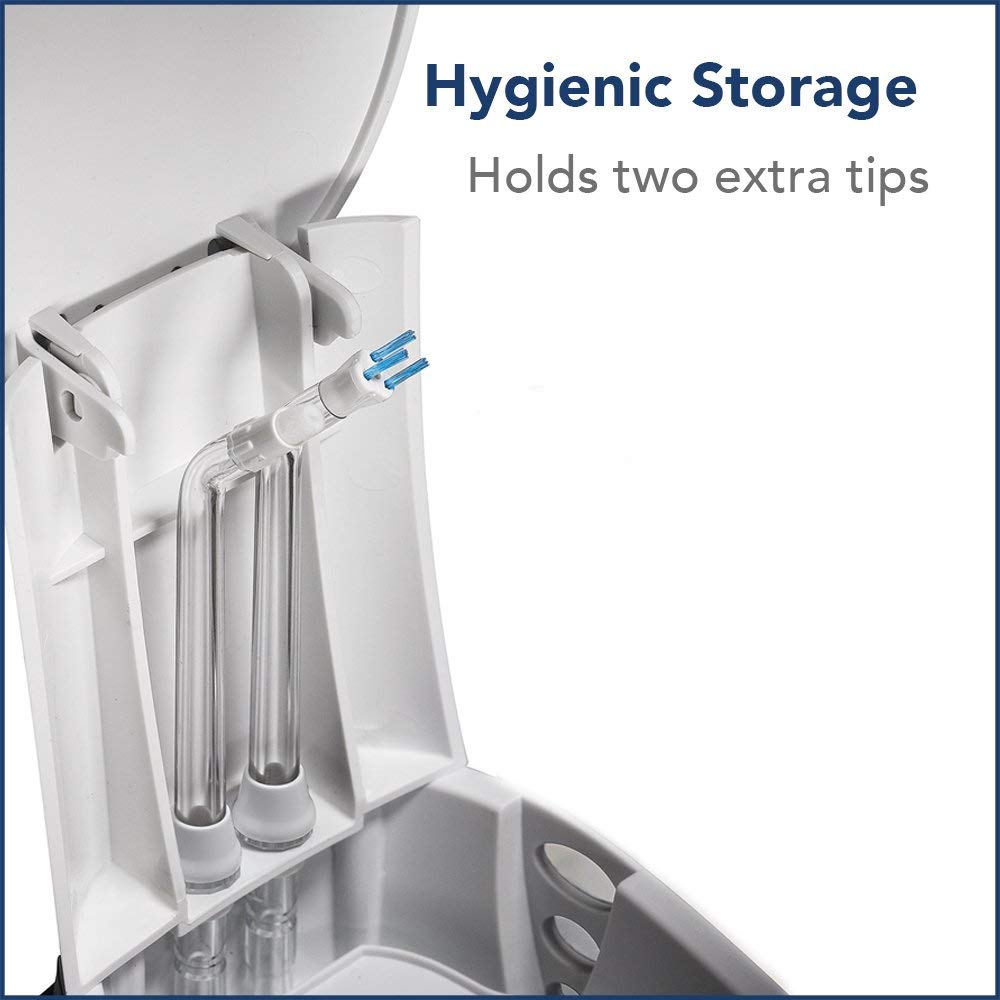
Right next to the reservoir is a small holder that you can use to store two of your most frequently used flosser tips. One small flaw of this holder is that it doesn’t seem to be designed to hold some of the larger flosser tips, such as the ones with bristles.
When the reservoir is in place, any bristled tips will press up against the container, bending them in the wrong direction. Over time this will quickly wear out the tip and they will not be as effective when you floss with them.
Controls
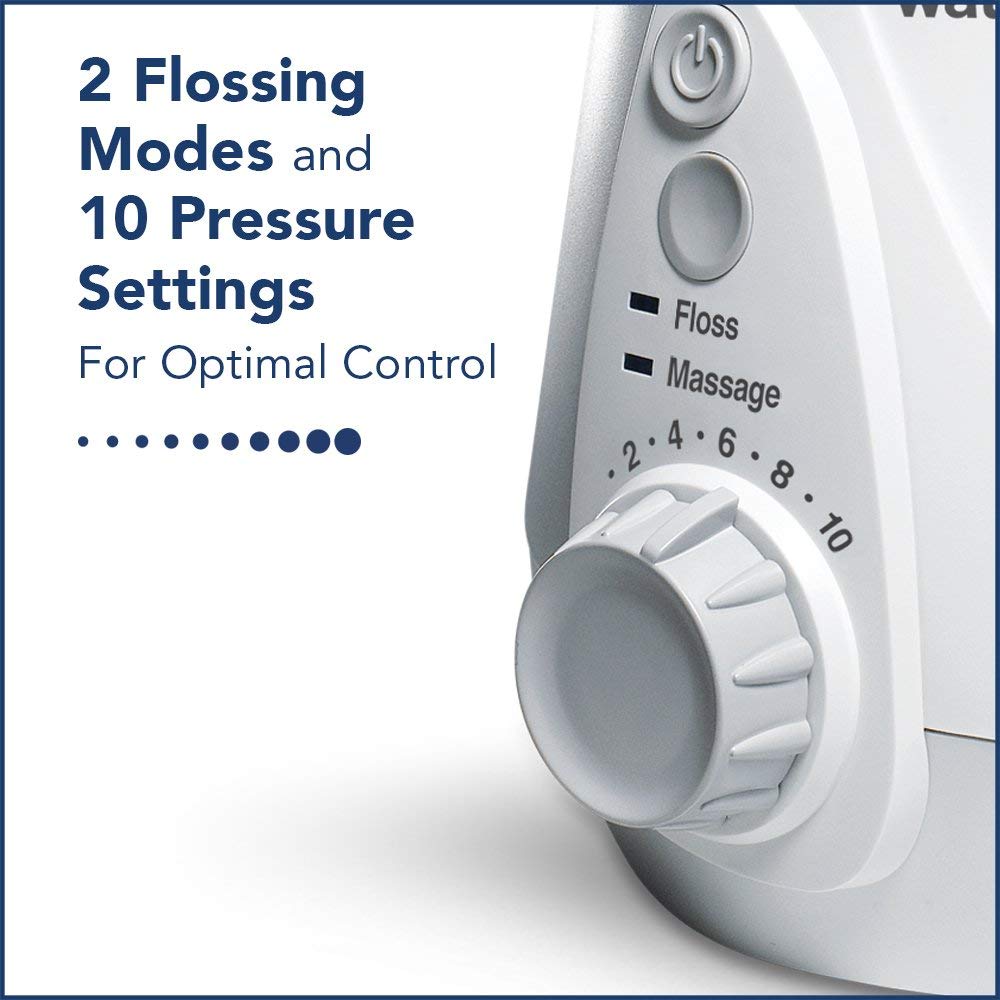
At the top we have the power control, which turns the device on/off.
Below that is the mode selector, which lets you select the floss (default) or massage flossing mode.
Lastly, at the bottom is the pressure dial, which lets you choose how strong the water pressure will be. At the lowest setting (1), the pressure is 10 PSI, and at the highest setting (10) it is 100 PSI, with 10 PSI increments between each setting.
Rubber Feet
Located at the bottom of the unit are five rubber feet that keeps it in place and reduces sliding on a wet bathroom counter. In general usage they are perfect, however if you forcefully drag the unit around the rubber feet can leave faint marks on your counter. Fortunately, it is easy to clean up, however you should lift the unit to prevent causing a mess.
Water Flosser Tips
As mentioned earlier, the Aquarius Professional Flosser comes with 7 tips to cover all your bases. Each one can be used to help you clean in a specific way, and we’ll cover which does what.

Classic Jet Tip – The standard head that is included with all models of Waterpik products. Three of them are included.
Pik Pocket Tip – Designed to send water deep into periodontal pockets.
Orthodontic Tip – The bristled head provides extra scrubbing power, helping you clean around braces and other orthodontic devices.
Plaque Seeker Tip – Similar to the orthodontic tip, three tufts of bristles surround the center hole that sprays water. This tip is designed to help you clean bridges, implants, and crowns.
Toothbrush Tip – Shaped like the head of an electric toothbrush but with the center hole of a water flosser, you can get the best of both worlds with this tip designed to scrub away plaque like a toothbrush.
Installing and Replacing a Flosser Tip
Installing a flosser tip to the handle takes seconds. Easily slide your desired flosser tip into the large hole at the top of the handle until you hear the click sound, indicating that it has been properly secured.
From there, you can rotate the tip in any of the 36 directions it is designed to turn. This is a fantastic feature, allowing you to angle the tip without worrying about it losing its position.
Removing the head is also very simple. On the side of the handle you will find a grey switch. Sliding it up will release the mechanism holding the tip in place, allowing you to remove it with your free hand.
Putting the Waterpik Aquarius Professional to the Test
Now that we’ve covered the features that the Aquarius Professional offers you, it’s time to see if they are as good as they seem.
First, removing the reservoir and filling it with water was easy. If you are worried about leaks, the spring loaded plug at the bottom prevents water from releasing until you’ve secured it back onto the base station.
With the water reservoir full, it was time to hit the power switch. As soon as we powered it on, we heard the roar of its water pumps as it sprang to life. It is loud enough to wake up anybody sleeping nearby, so make sure not to floss too late at night.
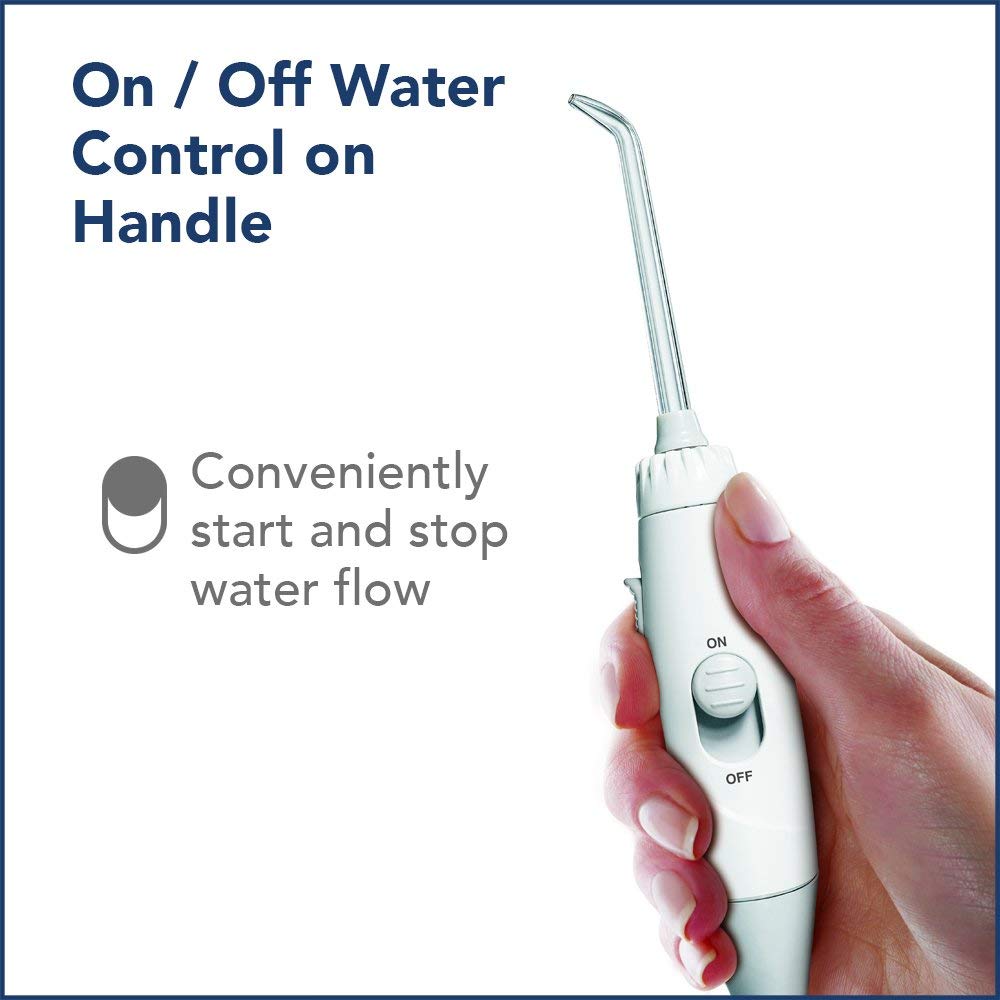
Until you slide the release button, water will not exit the handle. We liked how much control this gave us. For example, you may wish to maneuver the tip to the back of your teeth after you finish cleaning the front, but water would be wasted as you were adjusting (there is actually another built-in feature that addresses this that we’ll talk about soon). Now, the flow of water can be started and stopped at a moment’s notice.
Due to the numerous pressure range the Aquarius Professional Flosser has, it took us a few sessions to get a feel for which one worked best for us. As you might expect, the “ideal” pressure setting was different from person to person. As a general rule of thumb, you should start with the lowest pressure setting and increment it one setting at a time until you feel like the pressure is just right.
People with sensitive gums should probably stick to the lower ranges, but those who want maximum cleaning power can afford to turn the dial up all the way. The Aquarius Professional is unique among Waterpik products, as it is only one of three that can reach 100 PSI (the other models being the Ultra and the Complete Care).

We were curious to try out the “massage mode” which you can access by pressing the mode selector once. Normally, the water flosser sends a constant, uninterrupted stream of water. The “Hydro-Pulse Cleaning Mode” will cause the stream to start and stop intermittently, resulting in a pulsing sensation that is supposed to massage your gums.
Maybe you’ve heard of your dentist advising you to massage your gums, and this may be an attempt to replicate that advice. However, we felt that it was rather gimmicky instead of beneficial.
In the standard mode, there is a 30-second timer that briefly pauses the stream, giving you a few seconds to move to a different area of your mouth without wasting water. This feature is intended for you to pace yourself, so that you can spend an even amount of time cleaning each area of your mouth. Among our reviewers, the impressions on this feature were lukewarm. Many initially thought the water flosser had malfunctioned. Others didn’t see a point to it, citing that they don’t need a timer to remind them to clean a different area of their teeth.
If the dial is set to 10, it will use up all the water in a full reservoir in around 90 seconds. At first we thought this was too fast, but after some practice we felt it was sufficient time to thoroughly floss our mouths without having to refill it. Removing the reservoir and filling it with water is also smooth with how easy it is to detach and dock the reservoir into the base station.
Though the Aquarius Professional is sleeker and more compact than its predecessors, we still feel it takes up a significant amount of space on your counter. Unsurprisingly, owing to its size as a countertop flosser, it is not ideal to take with you when travelling. However, Waterpik does has a portable cordless model that may interest you.
Final Words

By upgrading the appearance of the ordinarily ugly countertop flosser to a sleeker and elegant design, Waterpik has created a product that is worthy of sitting on your countertop. The Aquarius Professional is one that we would be happy to display out in the open.
Its default cleaning mode is thorough and effective, which is what you’d expect from an industry giant like Waterpik. Using it in combination with any of the seven included flosser tips and you have yourself a one-stop solution to address nearly every dental issue.
Though we didn’t feel the massage mode added anything of value, and the tip holder feels more like an afterthought than a useful option, the Aquarius Professional is still overall one of the best in terms of performance and design.