Perhaps the most recognizable product within Waterpik’s roster of water flossers, the Ultra is known for its great price and its numerous useful features. Can you believe that this product was originally released in 2006? So the question is, can the Waterpik Ultra still hold its own against the current generation of water flossers? In this review, we find out if this product is able to stand the test of time.
There are two versions of this product on the market, the WP-100 and the WP-112. The only difference between these two is the color; the WP-100 is white with blue outlines, whereas the WP-112 is black with silver outlines. Everything else, from its features and included accessories, are the same. Out of these two we recommend the WP-100. The dark sections of the WP-112 make any water marks, toothpaste splatter, or fingerprints show up almost immediately, forcing you to clean it more often. Unless you are okay with this extra maintenance, just stick with the WP-100.
Table of Contents
What’s Included with the Waterpik Ultra?
Here’s what you get if you were to open up the box of a newly purchased Waterpik Ultra.
- Waterpik Ultra Water Flosser
- Plaque Seeker Tip
- Orthondontic Tip
- Toothbrush Tip
- Pik Pocket Tip
- 2x Classic Jet Tip
- Instuction Manual
Setting up is extremely simple. Just plug in the power cord, attach the desired tip, fill the tank with water, and hit the power button.
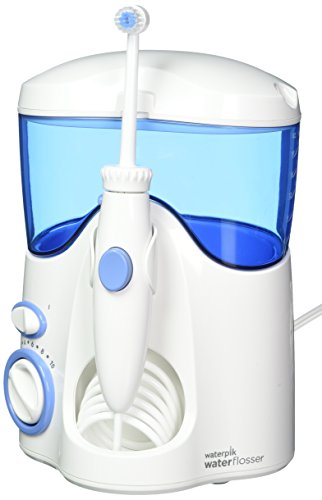
Overview of the Waterpik Ultra WP-100
Seeing as how it’s a 10-year-old product, the appearance of the WP-100 is unfortunately a little dated by today’s standards. Not that it looks particularly bad, but it’s not going to win any awards for its appearance. It’s often said to never judge a book by its cover, so as long as it can effectively clean your teeth, its appearance can be forgiven.
Next we will look at the various features that are included in this product that have made it a giant in the market for over 10 years.
Let’s start with the lid. Raising the lid up, you will find a space where you can store your most used flossing tips. This makes it easy if you have a particular routine where you need to use a few specific tips that you can keep all of it neatly stored. The holder area even has vents to allow air flow, which deters mildew and mold from growing, even with damp tips stored inside.
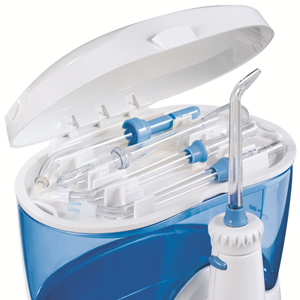
You can place up to 4 of your most used flosser tips inside. We like how the holder was designed to store the tips in alternating directions so that the mouth of the tip won’t press against the mouth of another tip. This way it keeps the tips hygienic, and it is especially useful if you have family that share your Waterpik.
This storage area also doubles as a cover for the water reservoir. By lifting the entire holder off the top, you can access the reservoir below.
The water tank can store up to 22oz of water, which translates to approximately 90 seconds of continuous use on the highest pressure setting. Measurements can be found on the side of the reservoir listed in both metric and imperial units.
Since the opening of the water reservoir is so big, you can even fill it up with a pitcher if you find it more convenient. Removing the reservoir from the base of the container is also quite easy if you’d rather fill it up in the sink.
There is a spring loaded valve on the bottom of the container which prevents water from escaping until it is loaded onto the main unit (or if you intentionally press it). The water container can be put in the top rack of the dishwasher but the valve should be removed. It is also quite cumbersome to remove the valve and it is very easy to lose it as you are waiting for the dishwasher to finish, so we wouldn’t recommend this method.
If you look to the bottom-left area of the Waterpik Ultra, you will find the controls. The top switch is the power switch. Just beneath it is the pressure dial. It has a range from 1-10, starting at 10 PSI and incrementing at 10 PSI per level, until reaching a maximum pressure setting of 100 PSI.

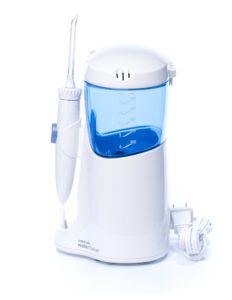
If you look the to the back of the Ultra, you will see the power cord. It stretches just over four feet long and is more than long enough to reach the power outlet.
Let’s take a look underneath the WP-100. Here, you will see eight rubber feet. The four larger feet are the primary supports and the four smaller ones keep it from tilting. This combination makes the unit very stable, and will prevent sliding on almost all countertops.
However, a word of warning. If you forcefully drag the Waterpik Ultra across the countertop you will probably see some dark skid marks. This is only an issue if you are not careful with the Ultra, and as time goes on the feet won’t produce skid marks anymore. We feel this is non-issue since the marks are easy to remove, and it generally won’t budge at all if you set it up properly.
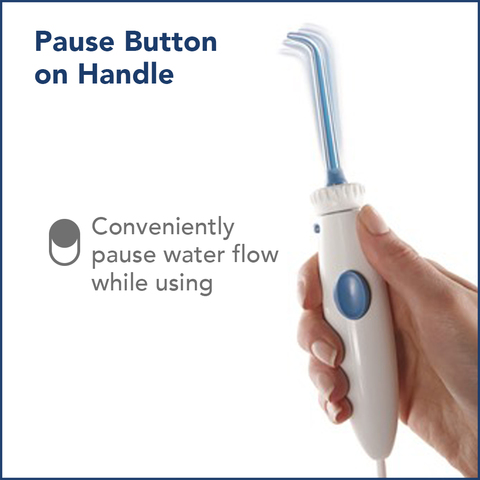
Lastly, let’s examine the water flosser handle. This handle, which is sometimes referred to as a wand or bulb, is the showpiece of the product hence why it is seated dead center. The blue button in the center of it controls the water flow. Pressing it down stops the flow, and releasing it lets the stream flow again.
This handle is connected to the main unit by a coil of pipe. The water is pumped out from the reservoir through the pipe and out the flosser handle and tip. If you fully uncoil the pipe, it reaches about two feet before it is pulled taut.
If you combine the two feet of pipe length with the four feet from the power cable, then even in the unrealistic event you need to stretch them out to their full length you have six feet of cable length to work with, assuming the flosser is far from the power outlet.
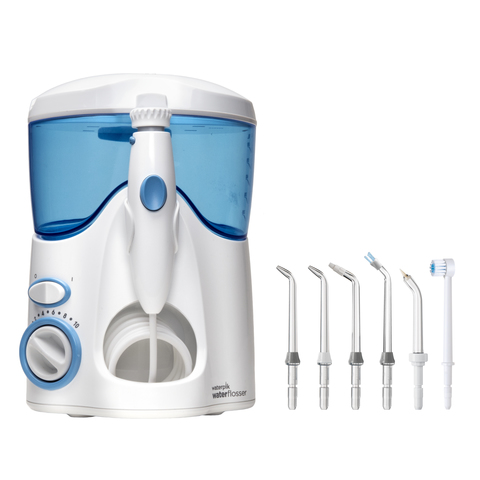
Waterpik Ultra Flosser Tips
As mentioned in the above “what’s included in the box” section, there are 6 flosser tips you can choose from. We will briefly go over each one below:
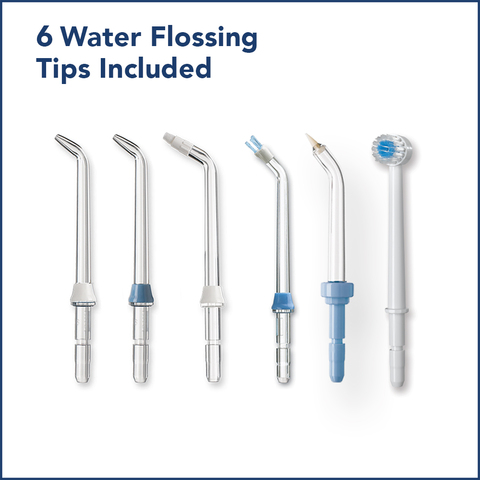
- Classic Jet Tip – The general purpose flosser tip that all Waterpik products come with. Two are included.
- Orthondontic Tip – The two tufts of bristles on the end assist in cleaning braces and other orthodontics.
- Plaque Seeker Tip – Like the orthodontic tip, three tufts of bristles provide extra cleaning power on dental work like bridges, crowns, or implants.
- Pik Pocket Tip – Great for cleaning periodontal pockets.
- Toothbrush Tip – The head of a toothbrush, but with a center hole that shoots water out, this is effectively a cross between a toothbrush and a water flosser.
Out of all water flosser manufacturers, Waterpik has the widest selection of flosser tips in the market. Since most of their tips are included with the Waterpik Ultra, you have the chance to try them out and find the best tip for you.
Installing any of these flosser tips is a breeze. Just slide the base of the tip you want to use in the hole at the top of the handle, and press down until you hear the click sound. This means the tip has been locked in place and can be rotated in 36 different directions.
We found this worked well for cleaning hard to reach areas but adjusting the position to suit our cleaning needs. We were able to get a more precise clean this way. To remove the tip, you just need to press the smaller button located on the side, just below the tip. This releases the lock on the tip, and you can easily take it out now.
Putting the Waterpik Ultra to the Test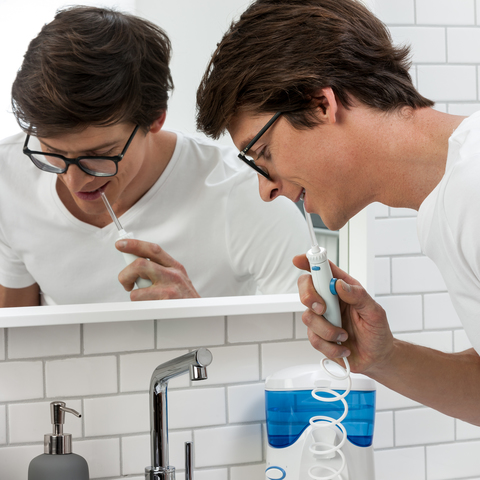
To get started, you need to fill the water reservoir with water. This can be easily done by removing the “lid” which doubles as a storage compartment for flosser tips, and filling it with a water pitcher or removing it from the main body and filling it under the sink.
Though the storage compartment is a great feature, we really wished it was connected to the main body of the Ultra. We are very finicky about hygiene, and a removable lid can potentially cause some problems. For instance, during our testing we noticed that setting the lid on our countertop as we were filling the reservoir with water caused some dust to be picked up and dropped into the reservoir when we placed the lid back on.
Of course, the solution is to keep your countertop sparkly clean, however we still feel this is something worth bringing up.
Moving on, the reservoir takes just a few seconds under the faucet for its 22oz capacity to be reached. It took almost no time at all to get the Waterpik Ultra set up and ready to floss. Once the water tank is full and you’ve attached a tip to the handle, just press the power switch and you can get started.
By default, the pressure setting should be at the lowest setting, which is 10 PSI. If you’ve never water flossed before or have sensitive teeth, just stick with this for your first flossing session. You can raise the pressure setting as your gums acclimate to the intensity. How high or low the pressure setting should be set depends on your preferences; there is no wrong setting, only what you feel is comfortable.
The Waterpik Ultra is one of the few Waterpik flossers that have pressure settings up to 100 PSI. The other products are the Complete Care and Aquarius Professional. If you need the highest pressure setting but aren’t impressed by what you’ve seen with the Waterpik Ultra so far, then you can check out the other two models.
If you set the pressure setting to 10 (100 PSI) then you can expect 90 seconds of flossing before the water tank is empty. Initially, many of our testers ran out of time and had to refill the tank to clean their teeth. As their skill and technique improved, they found that 90 seconds was more than enough time. Others who used lower pressure settings had even more time to floss.
Once you are finished, be sure to rinse the flosser tip and water tank to ensure it is clean for the next time you floss.
Closing Remarks
After using this product for ourselves, we can see how and why it withstood the test of time. It has its share of flaws (such as how it sticks out like a sore thumb next to modern appliances), but its cleaning power and plethora of features help it to go toe to toe with its competitors and even against the new kid on the block, the Aquarius Professional.
With its numerous pressure settings and flosser tips for almost any situation, you are able to clean even the toughest plaque and stubborn food debris on your teeth as well as tough to reach areas. Though its appearance may cause sore eyes, if you can look past that, then you have yourself a one-stop teeth cleaning solution that will impress even your dentist.